In this section you will learn how to create a
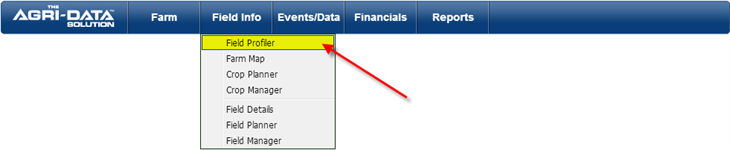
Navigate to Field Profiler
- From the top menu select Field Info
- From the dropdown menu select Field Profiler
- If you have not created a crop year you will be redirected to create a crop year.
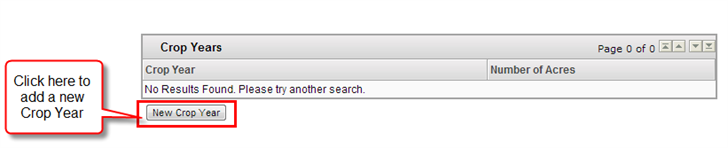
Add a New Crop Year
- You can start with your upcoming crop year or your previous crop year.
- You will be able to pull fields forward or backward to preserve keep the history of each field linked together.
- Enter the Crop Year
- Click the Save Info button

- After you have saved the Crop Year, it will appear on the table
- You will notice that there are not acres; this is because there are no fields assign to the Crop Year.
- Select the Crop Year
- A new screen will be displayed, here you can add as many fields as you wish to your Farm for the selected Crop Year
Add a New Field
- When you are adding a field for the first time in a Crop year
- Select the crop year.
- A new screen will be displayed, on the bottom it will appear two buttons.
- Click on the Add New Field button to enter a new field.

- A new form will be displayed, called Field Profiler on the Field Details tab.
- On this screen with the help of the dropdown menus for each section you can enter all the information related to your field.
- The form will look something like this:

- Field Details where it will have basic information regarding the field, such as, Field Name, Seeded Acres, legal land description, land ownership, among others.
- Please make sure to fill the required fields Field Name and the Seeded Acres on the top section.
- It is recommended that you also fill out the legal land locations as it can be used to locate the field on a map
- If the field contains more than one quarter section, you can use the plus symbol next to the description field. An additional row will be display to enter the next legal land values.
- Add a legal land description for each quarter that the field touches, also you can specify seeded acres and cult acres for each quarter added.
- This is very useful when you are dealing with crop insurance, selling carbon credits, etc. A field can be a combination of several legal lands, but managed as only one.

- Soil Details- it will include soil type, texture ENR, estimated nitrogen efficiency
- Irrigation- type and source of irrigation
- You can add more than one source of irrigation by clicking on the plus symbol
- The ENR (Estimated Nitrogen Release) is how many pounds of Nitrogen per percentage of organic matter is going to be added on top of what you fertilized, this amount will vary by area.
- Crop and Crop History- what crop is planted on the field (Alfalfa, Barley, beans, etc) for the current crop year, and previous crop years.
- Manure Application
- Contract Details- it will contain information such as, what type of processor, region, contract type, contract number processor pin.
- After you have entered all the information required, click the Save Info button on the bottom or Save and Go To Next Page button.
- After saving the information entered, a new screen will be displayed where you can review/check/edit the field information entered. To learn more about the Field Details screen <Click here>
- The next step after setting up your fields will be setting up your boundaries. So we can generate a Farm Map
- Also you can set the crop at the Crop Planner for all the fields that you created
- You can create a plan for your field at the Field Planner page
- Or apply the actual cost of your field at the Field Manager