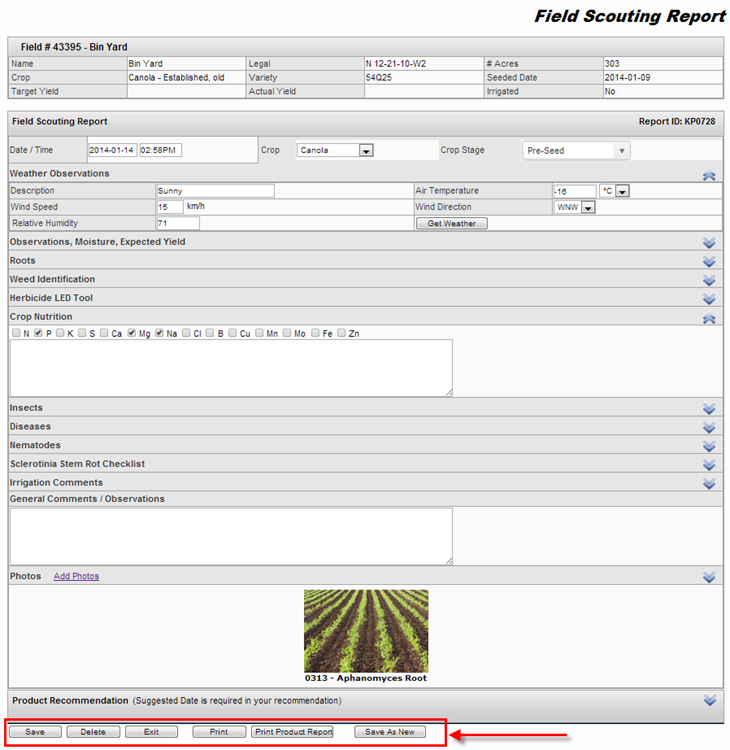
It is a great tool to add a report of what is happening in your field, you can enter details like, weather conditions, seeding depth, root development, weed identification, insects found, comments about irrigation, and you can upload images
Navigate to this screen:
- From the top menu select Events/Data
- From the dropdown menu select Field Scouter

- A form will be displayed where you can enter details like crop stage, the weather, etc
Functions that you can do
Add a Field Scouting Report
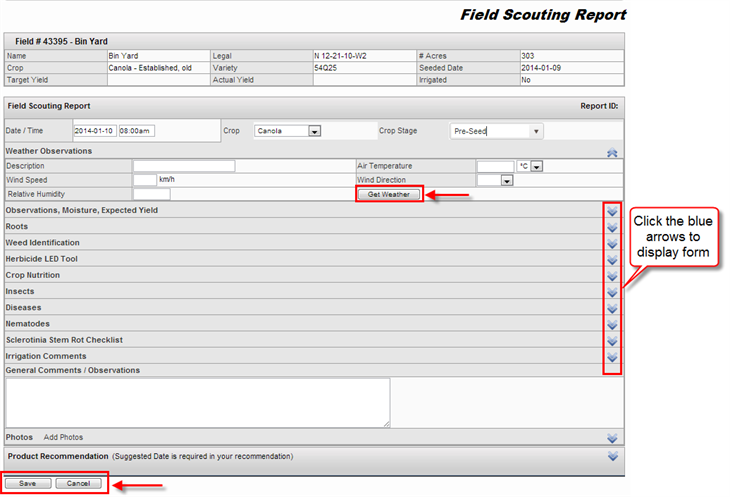
- To get the weather, just click on the Get Weather button. This function will looks at the legal land location, and then it will find the nearest weather station to get the data in. if there is not a weather station near you, the values might be off, but you can go and adjust the values manually.
- Make sure to set the date and time correctly.
- Click on the blue arrows to display the forms
- You can attach pictures to your reports via email
- You don’t have to fill all the sections available on the report, you only fill those that apply to your field conditions that you wish to report.
- After filling all the sections desired, click the Save button
Product recommendation
- It is located at the very end of the form. You can write a recommendation for that field.
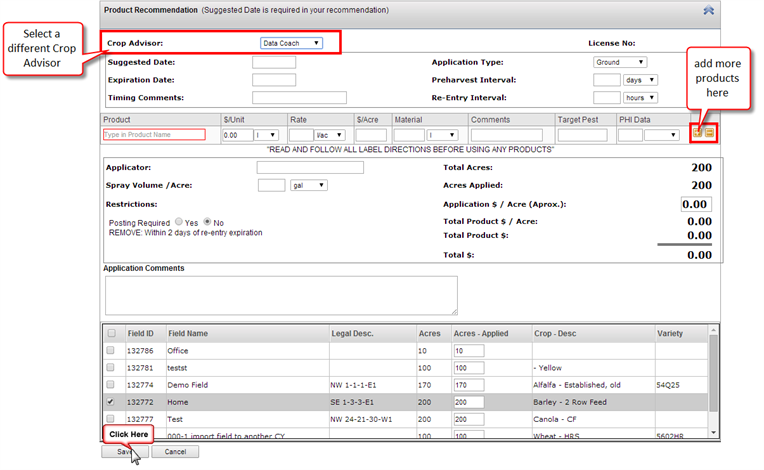
- Fill the suggested and expiration date, what type of product will be applied, at what rate, etc.
- You can easily add more than one product recommendation by clicking on “Plus” sign icon located at the end of the product information
- You can change the Crop Advisor using the dropdown list. this will reflect on the Field Scouting and Product Recommendation report
- You can also apply the same recommendation to more than one field. Just select the desired fields that you wish to apply it
- To save the information, click the Save button
At the very bottom, you will notice a set of buttons
- Click Save, to save the report
- If you wish to go back to the Field Manager screen click the Exit button
- If you wish to delete the report, just click the Delete button
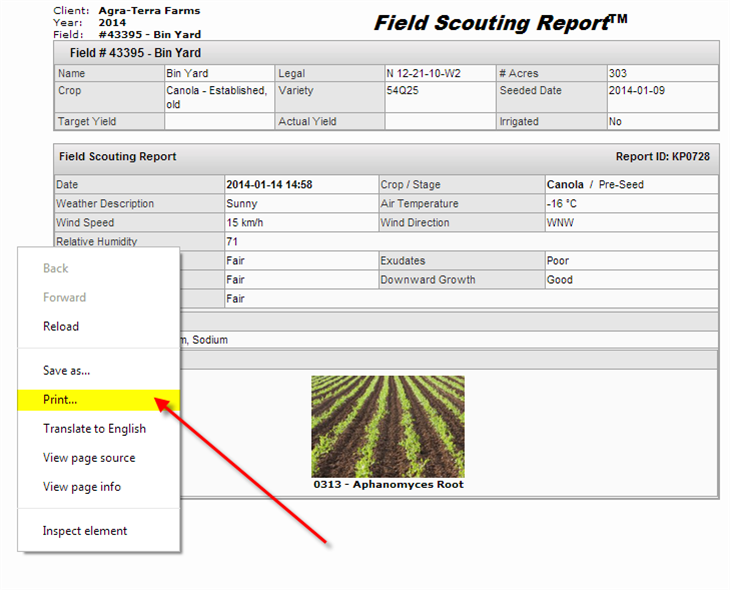
- The Print button displays a print preview of the report with all the information entered.
- The Print Product Report will only display the information entered in the section of Product Recommendation
- To print the reports, click the Print button.
- A new window will be displayed were you will notice all the information entered in the report
- Right click on the window and select the option Print… and print as you usually do
Upload pictures
- After you save the form, the Add Photos link will be activated and you might be able to upload pictures.
- Click on the Add Photos link
- It will take you to the Farm Files page, fallow the same procedure that you did on the Farm Files
- Click the Browse button, and locate the image you want to add from your computer
- After you fill the description information, click the Save button
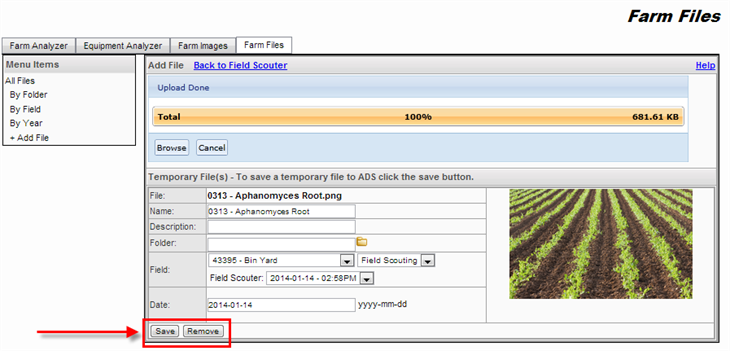
- After you have saved the image, the upload bar will be left. On the top there will be a link that says Back to Field Scouter.
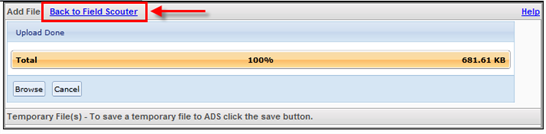
- Click the Back to Field Scouter link.
- Once again, you will be redirected to the Field Scouting Report, and the image will be attached at the end
Edit Images
- If you want to learn how to edit the image or replacing them in your Field Scouting report <Click here>
Preview/Edit:
If you want to preview or edit the reports entered, you can go to the Field Report and Recommendation Search screen
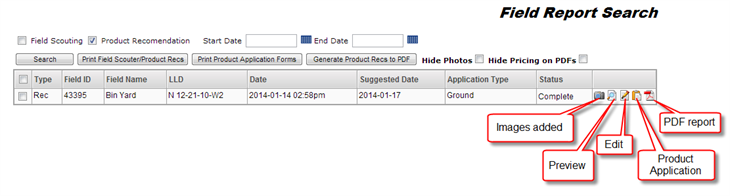
At the end of the row you will see some icons where you can (from left to right)
- Camera. If an image was attached to the report
- Preview the report
- Edit the report
- Product Application form. If a product recommendation was added to the report
- PDF format Report
There is another way to enter a Field Scouting Report, and is in the Farm Calendar, just click on the legend named Scout, or add it by clicking on the date that you desired to add the report and select the option Scout
Also you can add any Field Scouting or Product Recommendation in the Field Manager